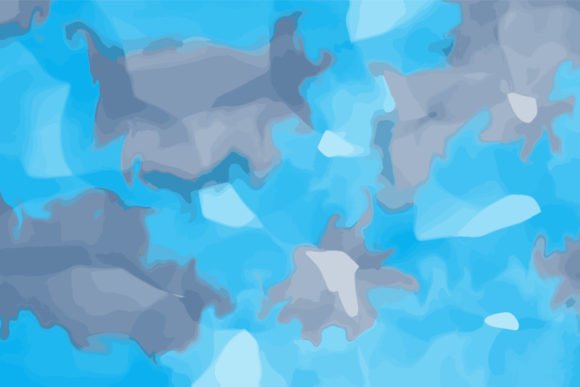
Abstract Blue Watercolor Background: Avoiding the Pitfalls That Undermine Your Design
Soft washes of blue, delicate pigment blooms, and that organic, fluid feel—an abstract blue watercolor background can instantly elevate a project. It brings a human touch, a sense of calm, and a timeless artistic quality. But here’s what many creators overlook: a beautiful asset in the wrong hands can flatten a layout, distract your audience, or even make your work look amateur. This isn’t about the design itself—it’s about how you choose, prepare, and apply it. Whether you’re designing a book cover in Canva, preparing a web banner for a client, or creating stickers for your small shop, understanding a few practical nuances will save you from results that feel “off” without knowing why.
You’re Not Just Buying a Pretty Swirl: What’s Actually in the File
One of the first missteps happens long before you open the file: ignoring the specs. A watercolor texture that looks luminous on a screen can turn muddy, pixelated, or completely unusable if you grab the wrong format. With this specific abstract blue watercolor background, you get two distinct versions packed in one ZIP. The JPEG is set at 300 DPI—perfect for print and digital projects that need a rich, high-resolution raster image. The EPS file is a vector format, which means you can scale it endlessly without losing clarity, recolor elements, or isolate parts in Adobe Illustrator. Both have their place, and confusing them leads to preventable headaches.
Beginners often open the JPEG in a word processor, stretch it beyond its pixel dimensions, and wonder why the edges look soft. Others try to edit the EPS in Canva without realizing that Canva doesn’t natively support EPS files—it works beautifully with the included JPEG instead. The solution? Before you do anything, pause and match the file type to your tool and output. If you’re working in MS Word or PowerPoint, the JPEG is your friend. For professional print work or when you need to tweak color curves, the vector EPS in Illustrator gives you absolute control. No single file does everything, and that’s exactly why both are provided.
The Resolution Trap That Ruins Printed Pieces
Even with a 300 DPI file, a common mistake is assuming that “high resolution” automatically means your final output will be crisp. DPI is relational—it depends on the size at which you place the image. Enlarge a 300 DPI image by 200% in your layout, and your effective resolution drops to 150 DPI, which can appear noticeably softer on a printed book cover or a sticker. This catches many self-publishers off guard when they stretch a digital background to fill a full paperback cover template without checking the physical dimensions first.
Here’s a better workflow: before you even import the background, know your canvas size. If your book cover requires 6×9 inches at 300 DPI, confirm that the JPEG’s original dimensions at 100% scale cover that area without interpolation. With the EPS file, you sidestep this entirely because vectors are resolution-independent—scale to a billboard or a mobile screen, and the strokes stay razor sharp. Many designers keep the EPS as their master file, then export a perfectly sized JPEG for the final application. That extra step prevents the disappointment of a blurry proof and the cost of a reprint.
Color Assumptions That Shift on Different Screens and Surfaces
Watercolor hues are inherently subtle, and the layered blues in this background can shift dramatically depending on your color mode. A frequent oversight is leaving the file in RGB when your project demands CMYK. That gentle cerulean wash on your monitor might print as a duller, flatter tone, especially on uncoated paper. If you’re using the JPEG directly in a print-on-demand platform or sending the design to a commercial printer, converting to CMYK early lets you see the real-world result and adjust saturation before it’s too late.
Don’t rely on your phone screen to judge accuracy, either. Calibrating your monitor isn’t a luxury; even basic visual checks against a printed reference can help. With the EPS file, you have the advantage of editing colors non-destructively in Illustrator—tweak the blue’s warmth or coolness to match your brand palette, or test a few swatches right on top of the background. If you’re creating for both web and print, keep two versions: an RGB JPEG for social media posts and a CMYK EPS for any physical product. It takes a few extra minutes but eliminates the “why does this look different?” moment.
When the Background Steals the Show Instead of Supporting It
A visually strong watercolor texture can easily become the enemy of readability. You see this often on social media posts where tranquil blue washes clash with white text placed without any contrast buffer. The eye doesn’t know where to focus. The fix isn’t to abandon the background—it’s to use it intentionally. For web banners or Instagram posts, add a semi-transparent overlay (a dark or light shape) behind your headline so the lettering remains crisp against the organic swells of pigment. Adjust the opacity until the texture still breathes through without fighting the message.
Equally problematic is applying the full, vibrant background behind dense body text on a website or in a presentation. Small paragraphs of text over a complex watercolor pattern quickly tire readers. Instead, reserve the unmodified background for hero sections, book cover backs, or areas with minimal copy. For slide decks in PowerPoint or Keynote, try using the design as a subtle header strip or a sidebar accent, not a full-slide backdrop that competes with every bullet point. The background is a tool, and like any tool, it works best when you direct where people look.
Ignoring the Flexibility That Comes with the Vector Format
Many creators stick exclusively to the JPEG because it’s familiar, never realizing they’re shutting down a world of creative possibility. Opening the EPS in Illustrator doesn’t require you to be a vector expert. Even simple maneuvers—like changing the blue to a muted teal for a different mood, or extending a clean edge to fit an odd-shaped canvas—are straightforward with basic selection and color fill tools. You can break apart the organic shapes, enlarge a particularly attractive paint bloom to become a focal point, or combine two copies with different opacities for a richer layered effect.
This level of control matters in real-world projects. Imagine you’re designing a mobile cover. The product template might have a cutout for the camera lens right where the main watercolor swirl sits. With the JPEG, you’d be stuck cloning or cropping awkwardly. With the EPS, you can nudge, scale, or mirror that swirl in seconds while keeping the rest of the composition intact. It also lets you create a seamless pattern for wrapping a book cover or fabric print—something that would be much harder with a fixed raster image. Learning just a couple of Illustrator basics pays back in versatility every time you use this asset.
The Checklist That Catches Costly Oversights Before You Publish or Print
When you’re eager to finish a project, it’s tempting to skip the technical once-over. But a five-minute review can be the difference between a polished, professional piece and something that reads as careless. Here’s a straightforward set of checks tailored specifically for this abstract blue watercolor background:
- File type match: Are you using the JPEG for raster-based apps (Canva, Word, web) and the EPS for any resizing or heavy editing? Using the right file prevents artifacting and saves time.
- Output resolution check: For print, have you confirmed the effective DPI at the placed size? If it dips below 250, start with the EPS or select a smaller portion of the JPEG to preserve clarity.
- Color mode confirmation: RGB for screens, CMYK for print. If you’re unsure, ask your printer whether they want a specific profile—some even prefer sRGB, so don’t convert blindly.
- Contrast buffer: Does your text or main graphic pop against the busiest area of the watercolor? If not, add a subtle gradient overlay or reposition the focal elements to a quieter zone.
- Background role: Is the background guiding the eye or distracting it? If you’re not certain, show the layout to someone without design experience and ask where they look first.
- Licensing and usage: Confirm the terms that came with your download. For most commercial projects—book covers, stickers, digital products—you need an asset that allows you to incorporate it into work you sell. Always check before you commit.
Where This Blue Watercolor Background Really Makes Sense
Some might treat it as a one-size-fits-all solution, but the real value comes from placing it where its strengths align with your message. For book covers, especially in genres like poetry, wellness, or literary fiction, the soft abstraction communicates emotion without literal imagery. It pairs exceptionally well with minimal typography and generous white space. On social media, a cropped section used as a branded post template gives your feed a cohesive, handcrafted identity without requiring new photos every day.
Stickers and mobile covers are perhaps the most forgiving applications—here, the organic paint strokes feel tactile and personal, even as a mass-produced item. When printed on matte vinyl, the watercolor grain holds beautifully. Be cautious, though: scaling a tiny section for a large phone case might reveal JPEG artifacts. That’s where the EPS shines again, letting you export at the exact dimensions and resolution demanded by the print shop.
A Smarter Starting Point
An asset like this isn’t just a background—it’s a creative shortcut, but only if you steer clear of the habitual mistakes that undermine good design. The next time you download a resource, resist the urge to immediately drag it into your canvas. Take those few extra minutes to inspect what you’ve received, match the format to the job, and consider how the human eye will travel across your finished piece. Small adjustments in placement, contrast, and color mode transform the same abstract blue watercolor background from a generic backdrop into a deliberate, effective design element.
If this specific texture fits your visual style, you’ll find a broader collection in the creator’s profile, where KDP interiors, T-shirt graphics, brushes, and illustrations extend the same practical, high-quality approach. And when you do create something with it, you’ll know you’ve built it on a foundation of good decisions, not just good taste.